Overview
In this tutorial, you’ll learn how to implement cookie-based authentication with Rails 8. Rails offers many authentication methods—even DIY ones—but cookies are secure, easy to use, and handled automatically by browsers.
While many tutorials use JWT, it has a major drawback: where do you store it? Local storage is insecure and easily exploited. Though you can secure JWTs with extra effort, it’s still a relatively new technology. If your primary API consumer is the browser, cookie-based authentication is safer and simpler.
Prerequisites
- Ruby (version 3.1 or later recommended)
- Rails 8 (latest stable version)
- PostgreSQL installed and running
- Node.js and npm/yarn (for React frontend and tooling)
- React 18+ (or compatible React version)
- Vite (or another React dev server with proxy support)
- Basic knowledge of Ruby on Rails API mode
- Basic knowledge of React and axios for HTTP requests
- PostgreSQL user with privileges to create and manage databases
- Linux (although you can use Windows or IOS)
Creating new Rails API app with PostgreSQL
rails new my-api --api -d=postgresql
Setup PostgreSQL database connection
Edit config/database.yml:
development:
  <<: *default
  database: my_api_development
  username: <%= ENV.fetch("DB_USER") %>
  password: <%= ENV.fetch("DB_PASSWORD") %>
Set environment variables:
EDITOR="code --wait" rails credentials:edit
You’re code editor will pop up and you’ll need to configure this. When you’re done close the editor.
secret_key_base: ...
DB_USER: CHANGE_ME
DB_PASSWORD: CHANGE_ME
PostgreSQL help
If you run into PostgreSQL issues, you can check its status and restart the service:
Check status:
sudo systemctl status postgresql
Start server:
sudo systemctl start postgresql
Generate User model and controller
rails generate model User username:string email:string password_digest:string
rails generate controller Users
Add has_secure_password and validations to User model
class User < ApplicationRecord
  has_secure_password
  validates :email, presence: true, uniqueness: true

  normalizes :email, with: -> e { e.strip.downcase }
end
Middleware setup for session cookies (enable cookies and session storage)
Add to config/application.rb:
config.middleware.use ActionController::Cookies
config.middleware.use ActionDispatch::Session::CookieStore, key: '_my_api_session', expire_after: 5.years
Authentication helpers in ApplicationController
These helpers will verify the presence of a user session. When a user logs in, their user_id is stored in the session cookie. Rails automatically decrypts this cookie and lets you access it in controllers.
class ApplicationController < ActionController::API
  before_action :authenticate_user

  private

  def authenticate_user
    render json: { error: "Unauthorized" }, status: :unauthorized unless current_user
  end

  def current_user
    @current_user ||= User.find_by(id: session[:user_id])
  end
end
Skip authentication for registration
Since users don’t have any account yet, you can’t authenticate them. Therefore you must skip the authentication entirely.
class UsersController < ApplicationController
  skip_before_action :authenticate_user, only: [:create]

  def create
    user = User.new(user_params)
    if user.save
      render json: user, status: :created
    else
      render json: { errors: user.errors.full_messages }, status: :unprocessable_entity
    end
  end

  private

  def user_params
    params.require(:user).permit(:email, :password)
  end
end
Setup API routes
namespace :api do
  resources :users, only: [:create, :show]
  resources :sessions, only: [:create, :destroy]
end
This sets up your app to run on /api namespace.
Setup a new React project with Vite
npm create vite@latest my-react-app -- --template react-ts
🛡️ React Frontend Proxy Configuration
To prevent CORS issues when connecting your React frontend to the backend, configure a proxy in your frontend setup. This ensures that API requests are properly routed during development without triggering cross-origin restrictions.
in vite.config.ts
export default defineConfig({
  plugins: [react()],
  server: {
    proxy: {
      '/api': {
        target: 'http://localhost:3000',
        changeOrigin: true,
        secure: false,
        ws: true,
      },
    },
  },
})
Example React call to create user
in App.tsx add:
useEffect(() => {
  axios.post("/api/users", {
    user: {
      email: "[email protected]",
      password: "securepass123"
    }
  }).then(response => console.log(response))
}, [])
This should return the new user.
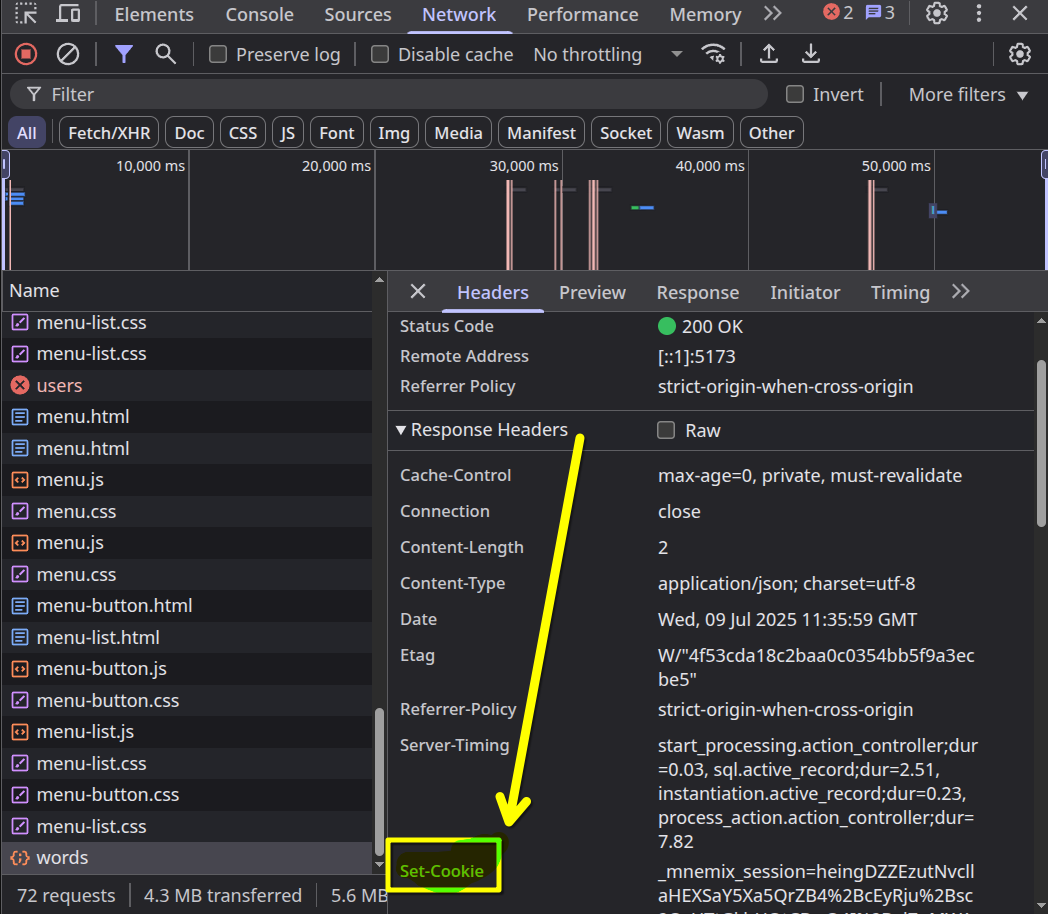
Check the network tab
Open DevTools (F12) and navigate to the Network tab. Look for the API request response and check for a Set-Cookie header—this confirms that the server issued a session cookie successfully.
Find Set-Cookie header and celebrate
Now once you’re in the network tab you’ll need to find the response from the server that includes Set-Cookie header.
If you found it you can now easily authenticate just by specifying withCredentials: true in axios.
Another possitive of this approach is that you are on the same domain, so you don’t even need to specify withCredentials: true.
Conclusion
You’ve learned how to implement cookie-based authentication—the most stable method for browser-based apps. But security doesn’t stop here. While this method avoids common client-side risks (like XSS via JavaScript), you should also consider:
- CSRF: Cross-Site Request Forgery prevention is crucial when using session cookies.
- Stronger password policies or OAuth logins
- Session expiration and logout
If you found this guide useful, feel free to share it or comment on LinkedIn!